Wednesday, March 31, 2010

Brioche Burger Buns


I made these for our first bbq of the season and 
out of all the breads I've ever made, I'm definitely the most proud of these burger buns (and my recent pitas).


Brioche Burger Buns 
Next time I'm going to try replacing at least half of the bread flour with whole wheat bread flour - I think they would adapt well.
From the NY Times via Smitten Kitchen.
Makes 8 4-5-inch buns.
3 tablespoons warm 1% milk
2 teaspoons active dry yeast
2 1/2 tablespoons sugar
2 large eggs
3 cups bread flour
1/3 cup unbleached all-purpose flour
1 1/2 teaspoons salt
2 1/2 tablespoons unsalted butter, softened
Sesame seeds (optional)
In a glass measuring cup, combine one cup warm water, the milk, yeast and sugar. Let stand until foamy, about five minutes. Meanwhile, beat one egg.
In a large bowl, whisk flours with salt. Add butter and rub into flour between your fingers, making crumbs. Using a dough scraper, stir in yeast mixture and beaten egg until a dough forms. Scrape dough onto clean, well-floured counter and knead, scooping dough up, slapping it on counter and turning it, until smooth and elastic, 8 to 10 minutes. The dough will be on the sticky side so it can be a bit messy, but keep in mind that the more flour you knead in, the tougher the buns will get. Try to leave them tackier than you would a round loaf.

Shape dough into a ball and return it to bowl. Cover bowl with plastic wrap and let rise in a warm place until doubled in bulk, one to two hours (I let mine go for close to 3 because I was busy doing other things).
Line a baking sheet with parchment paper. Using dough scraper, divide dough into 8 equal parts. Gently roll each into a ball and arrange two to three inches apart on baking sheet. Cover loosely with a piece of plastic wrap lightly coated in nonstick spray and let buns rise in a warm place for one to two hours. (I left mine for 2)
Set a large shallow pan of water on oven floor. Preheat oven to 400 degrees with rack in center. Beat remaining egg with one tablespoon water and brush some on top of buns. Sprinkle with sesame seeds, if using. Bake, turning sheet halfway through baking, until tops are golden brown, about 15 minutes. Transfer to a rack to cool completely.

Monday, March 29, 2010

Cabbage With Apple Cider Vinaigrette

For the most part I’ve been sharing baked goods because they usually have a story, a reason they’ve come to be. But what happens to all those things I eat in between cookies, cakes and ice cream – I promise, I do eat other things in between. Well those are the ones that slip through the cracks. Those are the ones that never get shared, the ones that go on silently in the shadow of their more outspoken counterparts. The truth is sometimes a recipe is just a recipe. Sometimes it doesn’t have a story or a thoughtful way in which it came to be. Sometimes the only reason I make something is to eat it. Sometimes I’m just hungry. Shouldn’t those foods get a chance to join the party too? I think so. 

Cabbage with Apple Cider Vinaigrette
I left out the apples this time because my housemate is allergic. Serves 2-6 depending on whether it's eaten as a side or a main course.

1 head green cabbage
1-2 golden delicious apples (optional)
apple cider vinegar
dijon mustard
good quality olive oil
salt and pepper

Whisk dijon mustard, vinegar and oil in a small bowl. I don't really measure it I just use a 1:1:1 proportion for the 3 ingredients so you can make as much or as little as you want. The mustard will help thicken it a bit. Set aside.

Cut off the bottom of the cabbage. Slice it into shreds as if you were going to make coleslaw. wash well in a colander and place in a wide shallow pot with 1/2-1 inch water. Cover and cook on high for a couple minutes until just tender. It should till have a crunch to it. Drain and toss with vinaigrette. Add salt and pepper to taste. Can be eaten immediately but tastes just as good or better after soaking overnight.

Side note:  I added this little twitter update box on the left hand side so you guys can follow me through my week in South Carolina, if you so choose.

Saturday, March 27, 2010

My First Daring Baker's Challenge - March - Orange Tian

Since I started this blog I've noticed that once a month Tastespotting was swamped with a million variations of the same recipe. French macaroons, Nainaimo bars, Tirimisu, all sorts of labor intensive desserts that I would probably never make; mostly because I rarely have an occasion to make such fussy desserts. These aren't things I ever crave the way I do a good lemon tart, my favorite poundcake, a big bowl the whole pint of vanilla ice cream, a chewy chocolate chip cookie, or even just a dark, dark bar of chocolate. So why would I want to make something as rich as tirimisu when I'd be happier with a bowl of ice cream and raspberries? Exactly, I need an excuse; A reason to make them.
These once a month recipe explosions are a result of The Daring Baker's Challenge.  Every month a different daring baker hosts the challenge. This means they pick a recipe and write the guidelines. There are always certain components you must make but there is also some wiggle room for you to tweak it a bit, for you to make it your own. That's when it hit me; This is the perfect way to get myself baking outside the box. Nothing says accountability like a requirement to post your results for all of blog world to read.
I'm not going to lie, when I first read this month's challenge, I was skeptical to say the least. I wasn't upset about the amount of steps involved and I was actually pretty excited to make marmalade. It was just that an Orange Tian didn't really sound like something I wanted to eat. It didn't sound bad but it just didn't sound all that good either. Never the less I committed to this and I was not about to give up before I even started. Instead I picked a night to serve it and set out to buy my ingredients.
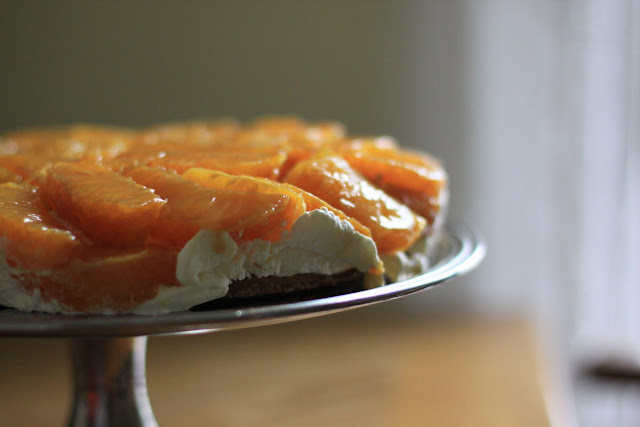
Well, I was dead wrong. I will definitely be making this again. The oranges were refreshing with the light, airy whipped cream, and the flaky crust at the bottom really brought the whole thing together.


Orange Tian
Ideally, you should have about 6 cookie cutters to build the desserts in and cut the circles of dough. The cookie cutters will be the size of your final dessert, so they should be the size of an individually-sized tart mold. I didn't have these so instead I used a 10-inch spring form pan without the bottom.


Preparation time:
Pate Sablee: 20 minutes to make, 30 minutes to rest, 15 minutes to roll out, 20 minutes to bake
Marmalade: 20 minutes to make, 30 minutes to blanch
Orange segments: 20 minutes, overnight to sit
Caramel: 15 minutes, overnight to sit
Whipped Cream: 15 minutes
Assembling: 20 minutes
Freezer to Set: 10 minutes

For the Pate Sablee:
2 medium-sized egg yolks at room temperature
6 tablespoons + 1 teaspoon; 2.8 oz; 80 grams granulated sugar
½ teaspoon vanilla extract
¼ cup + 3 tablespoons; 3.5 oz; 100 grams ice cold, cubed Unsalted butter
1/3 teaspoon; 2 grams Salt
1.5 cup + 2 tablespoons; 7 oz; 200 grams All-purpose flour
1 teaspoon ; 4 grams baking powder

Put the flour, baking powder, ice cold cubed butter and salt in a food processor fitted with a steel blade.
In a separate bowl, add the eggs yolks, vanilla extract and sugar and beat with a whisk until the mixture is pale. Pour the egg mixture in the food processor.
Process until the dough just comes together. If you find that the dough is still a little too crumbly to come together, add a couple drops of water and process again to form a homogenous ball of dough. Form into a disc, cover with plastic wrap and leave to rest in the fridge for 30 minutes.

Preheat your oven to 350 degree Fahrenheit.

Roll out the dough onto a lightly floured surface until you obtain a ¼ inch thick circle.
Using your spring form pan, cut out a circle of dough and place on a parchment lined baking sheet. Bake for 20 minutes or until circle is just golden.

For the Marmalade:
The marmalade was a bit sticky and chewy from the chunky orange rinds. I happen to really like candied citrus peels so it didn't bother me but if orange peels aren't your favorite, you just chop them up finer in a food processor before cooking down to a syrup.

¼ cup + 3 tablespoons; 3.5 oz; 100 grams Freshly pressed orange juice
1 large orange used to make orange slices
cold water to cook the orange slices

granulated sugar (use the same weight as the weight of orange slices once they are cooked)
Finely slice the orange. Place the orange slices in a medium-sized pot filled with cold water. Simmer for about 10 minutes, discard the water, re-fill with cold water and blanch the oranges for another 10 minutes.
Blanch the orange slices 3 times. This process removes the bitterness from the orange peel, so it is essential to use a new batch of cold water every time when you blanch the slices.
Once blanched 3 times, drain the slices and let them cool.
Once they are cool enough to handle, finely mince them (using a knife or a food processor).
Weigh the slices and use the same amount of granulated sugar .
In a pot over medium heat, add the minced orange slices, the sugar you just weighed, the orange juice and the pectin. Cook until the mixture reaches a jam consistency (10-15 minutes).
Transfer to a bowl, cover with plastic wrap and put in the fridge.

For the Orange Segments:
8 oranges.
Cut the oranges into segments over a shallow bowl and make sure to keep the juice. Add the segments to the bowl with the juice.
For the Caramel:
1 cup; 7 oz; 200 grams granulated sugar
1.5 cups + 2 tablespoons; 14 oz; 400 grams orange juice

Place the sugar in a pan on medium heat and begin heating it.
Once the sugar starts to bubble and foam, slowly add the orange juice. As soon as the mixture starts boiling, remove from the heat and pour half of the mixture over the orange segments.

Reserve the other half of the caramel mixture in a small bowl — you will use this later to spoon over the finished dessert. When the dessert is assembled and setting in the freezer, heat the kept caramel sauce in a small saucepan over low heat until it thickens and just coats the back of a spoon (about 10 minutes). You can then spoon it over the orange tians.
For the Whipped Cream:
Gelatin grosses me out a bit so for the stabilized whipped cream I simply beat the heavy cream with cream of tar tar. It may not have been quite as stiff as the gelatin version but it worked well enough.

1 cup; 7 oz; 200 grams heavy whipping cream
1 tablespoon of confectioner's sugar
1 tablespoon cream of tar tar

Fit a stand mixer with the whisk attachment. Whisk on high until stiff. Refrigerate for 20 minutes or up to overnight.


Assembling the Dessert:
Make sure you have some room in your freezer. Ideally, you should be able to fit a small baking sheet or tray of desserts to set in the freezer.
Line a small tray or baking sheet with parchment paper or a silicone sheet. Lay out 6 cookie cutters onto the parchment paper/silicone.
Drain the orange segments on a kitchen towel.
Have the marmalade, whipped cream and baked circles of dough ready to use.
Arrange the orange segments at the bottom of each cookie cutter. Make sure the segments all touch either and that there are no gaps. Make sure they fit snuggly and look pretty as they will end up being the top of the dessert. Arrange them as you would sliced apples when making an apple tart.
Once you have neatly arranged one layer of orange segments at the bottom of each cookie cutter, add a couple spoonfuls of whipped cream and gently spread it so that it fills the cookie cutter in an even layer. Leave about 1/4 inch at the top so there is room for dough circle.
Using a butter knife or small spoon, spread a small even layer of orange marmalade on each circle of dough.
Carefully place a circle of dough over each ring (the side of dough covered in marmalade should be the side touching the whipping cream). Gently press on the circle of dough to make sure the dessert is compact.
Place the desserts to set in the freezer to set for 10 minutes.

Using a small knife, gently go around the edges of the cookie cutter to make sure the dessert will be easy to unmold. Gently place your serving plate on top of a dessert (on top of the circle of dough) and turn the plate over. Gently remove the cookie cutter, add a spoonful of caramel sauce and serve immediately.

Friday, March 26, 2010

Carolina in my mind

In my mind I'm going to Carolina. 
Can't you see the sunshine, 
can't you just feel the moonshine?
-James Taylor

Actually, I really am going to South Carolina. 10 days of rowing (coxing) and warm sun plus a day trip to Charleston. We're all packed and leaving in just 2 hours. I probably won't have much internet access (which I'm very much looking forward to) but don't worry, I have a few posts scheduled. See you on April 6th!

Thursday, March 25, 2010

To wake up early


We are on the water again. Twice now actually.

I haven’t decided how I feel about it. On one hand I’m reluctant to lose my morning workout from winter training, not to mention that hour of sleep that we lose due to a practice time of 5:20AM. On the other hand, it’s nice to be back on the water. Really nice.
I like to wake up early and get a jump on the day and early practice forces me to do just that. Although, if you ask me at 4:45AM, when my alarm rudely chimes with no regard for my desire to stay in bed, I would surely disagree. At 4:45AM, as I trudge to the bathroom to brush my teeth, back to my room to put on every layer of clothing in my closet, and sleepily gather my car keys to make the twenty-five minute drive; I would not remember why I like to wake up early. I would not remember the brisk morning air; the smooth, steady clicks of the oarlock; and the rhythm of the slide alternating with the quiet splash of the catch. I would not remember the way the water sounds sliding under the keel between parallel puddles; the way the rudder strings slip through my hands, as they guide the shell away from the dock; or the colors of the sunrise over the river.
No, at 4:45AM the only thing I would be thinking about is the nap that I would like to take after breakfast. Of course, by the time breakfast is over, it would be four hours later; and I would be wide awake contemplating, not how long to nap but instead, what to pack for lunch.
Whole Wheat Farfalle with Spring Vegetables and Quark
During busy weeks I’ve taken to grilling a pound or more of chicken breasts on a Sunday when Colin starts the grill. I can eat it all week and it puts my mind at ease knowing that all I have to do is add a pile of vegetables – lately I like them just lightly steamed. I know that sounds boring but with a few little tweaks I can have a different meal each day. I encourage you to seek out quark, not just for this recipe but in general. I’ve spoken of it before but this is the first time I actually bought it. Let me just say, wow. It’s so beyond delicious and can be eaten a number of different ways. So far, my favorite is spread on top of a few juicy strawberries for an afternoon snack.If you can’t find quark you could substitute ricotta but it won’t have that same creamy, tartness to it. In fact I think a 2% greek yogurt might be a closer replacement. Serves 2.

4oz. Whole Wheat Farfalle
1 cup frozen green peas
1 small zucchini
~15 asparagus spears
2oz. quark
6-8oz. grilled chicken breast (see recipe below)
1/4-1/2 cup freshly grated pecorino romano cheese or parmesan
salt and pepper to taste

Bring a pot of salted water to a boil. Add pasta and cook until al dente.
While the pasta is cooking break the tough ends of the asparagus spears and cut into 1/2 inch pieces. Place in a steamer pot.
Slice zucchini into half inch thick rounds then cut the rounds into quarters and add to steamer. Add peas and steam, covered until just tender (I just take the edge off and leave them pretty crisp).

Chop chicken breast into 1/2 inch pieces, set aside.

When the pasta is done drain and pour into a large bowl. Mix in quark and romano cheese. Top with vegetables and chicken and serve.


Grilled Chicken Breast
I left out the measurements because you can make as more or as little as you want.
Usually the breasts I buy are about 1/2 each so I slice them in half and end up with 40z. chicken cutlets.

All-natural organic chicken breasts
Balsamic Vinegar
Dijon Mustard
Olive Oil
Salt and Pepper

Prepare propane or charcoal grill.

In medium bowl, whisk together vinegar, mustard, and olive oil on a 1:1:1 ratio. Mix enough to generously coat chicken and reserve extra dressing if you have any. I never end up making enough so I just mix up more as I go. Sprinkle chicken with generously with salt and pepper, pour extra dressing over chicken and let marinate a few minutes.

Grill a few minutes in each side until cooked through. Store leftovers in the fridge to be eaten all week.

Tuesday, March 23, 2010

A perfect balance


"Settling down with warm-glow wood stove and kerosene
peace you're looking for, peace you'll find 
in the tangled mad cliff-sides and crashing dark of Big Sur 
Rapturous ring of silence pacific fury flashing on the rocks, the sea shroud towers 
the innocence of health and stillness in the wild of Big Sur"
-Jay Farrar

Recently, I was flipping through my copy of The Big Sur Bakery Cookbook with it's beautiful pictures and wonderfully rustic recipes. They are a perfect balance of impressive flavor combinations and simple, seasonal ingredients. It makes me want to move to California for the farmer's markets. The farmers markets, the local produce, and the outdoorsy, earthy lifestyle. It makes me want to move to California and visit Big Sur.
Every component in every recipe is made completely from scratch, even the graham crackers for a the crust of graham cracker tart. While, I'm completely in favor of grinding up real graham crackers instead of buying graham cracker crumbs, I just don't have the time to make an entire batch of homemade crackers to just go ahead and grind them up once they come out of the oven. Instead I buy an organic brand with no preservatives, corn syrup or unnecessary ingredients, which is exactly what I did for this lime meringue tart.
I made it this past weekend for my friend, Gracie. She had been hinting, not too subtly I might add, that she would be in town for her birthday and that she really likes things made with lime. I was intrigued by the combination of the tart with homemade ginger ice cream, which I have to say, really was a perfect balance.
Clovis' Lime Tart with Ginger Ice Cream
Adapted slightly from The Big Sur Bakery Cookbook. I really love the way every recipe uses all parts of an ingredient. If you need egg whites for one part of the recipe (the meringue) then you will inevitably need the yolks for another (the ice cream). This way you don't end up with 12 egg yolks in your fridge. 
I doubled the recipe and made an 11-inch tart as well as a 10-inch spring form tart. There was more than enough filling and meringue and I actually filled two single serving ramekins as well. The recipe below is for one 11-inch tart.

For the shell:
2 cups graham cracker crumbs (about 24 graham crackers ground in a food processor)
2 tablespoons sugar
2 tablespoons unsalted butter, melted, melted plus more for the pan

For the lime filling:
1 1/2 cups fresh lime juice
1 cup sugar
6 eggs
1 cup heavy cream

For the meringue:
6 egg whites
1 cup plus 2 tablespoons sugar
1/4 tsp kosher salt
1/4 tsp vanilla

Pre-heat the oven to 350 degrees

Combine graham cracker crumbs sugar and melted butter in a bowl. Grease an 11-inch tart pan with a removable bottom. Refrigerate for 20 minutes then bake for 7-10 minutes until the shell begins to smell toasty. Remove from oven and let cool.

While the shell is cooling, whisk all lime filling ingredients and cook in a medium saucepan over low heat. Stir constantly until the mixture thickens enough to coat the back of a spoon, 7-10 minutes. Pour into the crust and bake 10-15 minutes or until the filling is set. You can tell if it's set by touching the center - if it doesn't stick to your finger it's done. Mine took a bit longer than 15 minutes. Let the tart cool to room temperature then place in the freezer for 25 minutes to prevent it from over cooking when you brown the meringue. I made mine in advance so instead of freezing it and finishing it with the meringue, I put it in the fridge until the next day. It held up just fine and I added the meringue in the afternoon the day that I served it.

When ready to make the meringue, place the egg whites, sugar and salt in the stainless steel bowl of a stand mixer (or another heatproof bowl). Place the bowl in a saucepan of barely simmering water. Whisk the mixture completely until the sugar crystals dissolve. Remove the bowl from the heat and whisk with an electric mixer fitted with the wire whisk attachment on high speed until medium peaks form. Add the vanilla and whisk to combine.

If you refrigerated the tart place it in the freezer for 15 minutes minutes before piping the meringue. Remove from the freezer and pipe meringue using a pastry bag and large decorating tip, I used a zip-loc bag instead of a pastry bag and it worked just fine. Place the tart on the top rack of the oven and bake until the meringue has browned. The book says 2-4 minutes but mine took closer to 6 or 8. My oven isn't the best though so just watch it closely. I also rotated mine halfway through. Refrigerate to cool and set.
When ready to remove from tart pan and transfer to a platter. Run a chef's knife under hot water and wipe dry. Cut tart into slices wiping blade in between each cut. Serve with a scoop of ginger ice cream, (seriously, don't leave this out the combination was really delicious).


Ginger Ice Cream
Makes 6 cups.

4 thumb-pieces fresh ginger
2 cups whole milk (I used 1% with no trouble)
2 cups heavy cream
1/2 cup honey
2 cups sugar
12 egg yolks

Peel the ginger and cut into slices. Place the slices in a saucepan with just enough cold water to cover and bring to a boil.
Strain and rinse the ginger under cold running water. Combine the ginger and 1 cup of the milk in a blender, and puree until smooth. Combine the ginger mixture with the cream, the remaining 1 cup of milk, the honey, and half of the sugar in a medium saucepan and bring to a boil. Remove the mixture from the heat and let it steep for 10 minutes.


Meanwhile, whisk the egg yolks with the remaining 1 cup sugar in a large bowl until smooth.


Bring the cream mixture back to a boul and temper the hot liquid into the egg yolks by adding it to the yolks a ladle at a time while whisking vigorously. Strain the liquid through a fine-mesh sieve into a bowl. Discard the ginger and return the liquid to the pan. Cook over very low heat, stirring constantly with a wooden spoon, until the liquid is thick enough to coat the back of a spoon. Refrigerate until it's cold. Freeze the mixture in an ice cream maker according to the manufacturer's directions.

Live Activity Feed