Monday, May 31, 2010

Something new to me.

I'm not sure how I feel about raw asparagus. I love them cooked and always have; blanched, steamed, roasted, bar-b-qued until they're blackened and carmelized with balsamic vinegar. But raw? Raw was something new to me, something I hadn't thought of. But, as with anything else, food is susceptible to trends and when one person in blog world writes about an idea, it catches on. Other's will try it, add their own twist, link to it, and spread the word. Soon google reader is filled with variations on the original recipe and everyone's joining the party.
Shaved raw asparagus has become one of those trends - sure it may not be as big as the french macaron explosion of 2009 but then, few foods are. There may be a confounding variable at work here, after all asparagus season is short and they tend to dominate vegetable consumption during this time but, still, I've been seeing just as many raw recipes as I have roasted.

As I said earlier, I'm not sure how I feel out it but I've made this salad a handful of times in the past weeks so something much be drawing me to it - maybe it's the crunch. Try it yourself and see.


Shaved Asparagus and Arugula Salad
Serves 4 as a side or 2-3 as a main course.

1 bunch raw asparagus, woody ends snapped off
4 handfuls baby arugula
Shaved fresh Pecorino Romano cheese
Fresh ground sea salt and black pepper
White balsamic vinaigrette (recipe below)

Place a large handful of arugula in each of four bowls and set aside.
Cut the tips off the asparagus and set aside.
Using a vegetable peeler, shave the asparagus into long strips and divide them amongst the four bowls of arugula.
Top each bowl with the asparagus tips, salt, pepper and shavings of the Romano cheese.
Drizzle with white balsamic dressing and eat immediately.


White Balsamic Vinaigrette
This is really more a recipe of proportions than specific measurments. Typically the ratio of oil to vinegar or acid is 2:1 respectively but, because I like mine sharper, I do 1:1.

White balsamic vinegar
Good olive oil
All natural dijon mustard

In a small bowl whisk together 1 part vinegar and 1 part olive oil. Whisk in enough mustard to thicken the mixture and add a tang (about 1 teaspoon for every serving of dressing). Can be refrigerated about a week or so in an airtight container.

Sunday, May 30, 2010

Better than Nutella

Nutella is one of those foods that I just won't buy. Not since my freshman year in college anyway. Back then I bought it twice or three times when I first moved into the dorms. I ate it on everything from toast to fruit and it was especially good right off a spoon directly from the jar. Of course each jar disappeared all too quickly (a week or less a piece), and I decided Nutella was a food better left in Supermarket. 
The next three years went by without so much as a thought of, or even craving for Nutella until one misty morning in early 2009. I was in India, in the city of Varanasi (formerly known as Benaras). I sat down to breakfast and on the table was a jar of Nutella and a basket of bread. I remembered it's smooth, creamy texture and immediately toasted a slice of bread, spread a thick layer of the dreamy, chocolatey, goodness and took a bite. It was just as I'd remembered it. Better, actually, because by then I had been in India for over two weeks and I was definitely missing familiar foods. I ate a few more slices, closed the jar and went about the next year as I had the past three. 
Then one day this past February, I made my own Nutella. I figured if I made it myself, I can control what goes into it. I can make the main ingredient nuts instead of sugar, I can leave out the preservatives and I can certainly leave out the hydrogenated oils. My first attempt came out alright. I used a tiny food processor and the texture wasn't spectacular. I used honey for the sweetener and it lent a taste that I said I didn't mind, but later decided wasn't my favorite. Last but not least every recipe I looked at had added oil so I added a bit as well - just to try to smooth it out. The result was good and I was completely thrilled with it at the time, but I didn't find myself making it again. In fact, I pretty much forgot about Nutella altogether, until I spied an especially delicious looking chocolate croissant in the bakery the other day. It reminded me of when I used to eat croissants slathered with the stuff in high school. 


I decided to try again. 
Only this time, it would be different. 
This time, it would be better.
This time, it would be so good, I wouldn't even call it Nutella.
This time, it would be better than Nutella.
I used an 11-cup food processor, powdered sugar and no added oil. After all, the nuts have plenty of oil in them already and that really should be sufficient. It turns out I was right. Just 4 ingredients made the best chocolate-hazelnut spread I've ever tasted with less fat, calories and sugar than Nutella.
Better than Nutella
It's important to use a food processor with a capacity of 11-cups or larger otherwise the nuts will not smooth out properly. Makes about 1 1/2 cups

2 cups hazelnuts
1/4 cup natural unsweetened cocoa powder
6 tablespoons powdered sugar
1 tsp vanilla

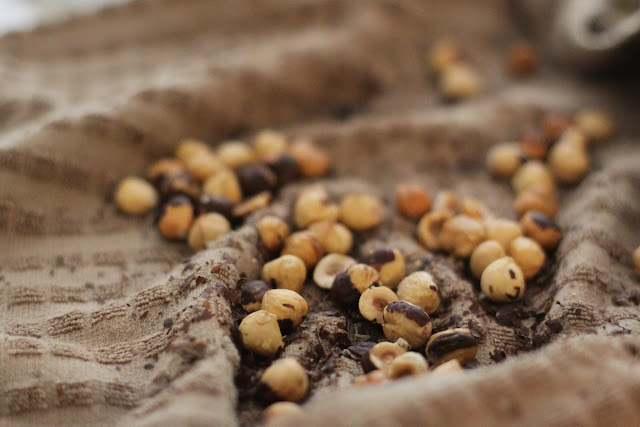
Preheat oven to 350 degrees F. Place hazelnuts in a single layer on a shallow baking pan. Toast until the skins are almost black and the meat is dark brown, about 15 minutes. Stir the nuts halfway through baking to ensure an even color.

Since the skin is bitter, you’ll want to discard them. Wrap the cooled hazelnuts in a clean kitchen towel or paper towel, and rub until most of the skins have come off. Don’t worry if you can’t get off all the skins.


Process nuts in a food processor, scraping down the sides of the bowl occasionally, until they have liquefied, about 5 minutes. First, you will get coarsely chopped nuts, then a fine meal. After a little while, the nuts will form a ball around the blade, and it will seem like you only have a solid mass. Keep processing. The heat and friction will extract the natural oils, and you will get hazelnut butter.

When the nuts are liquified, add the cocoa and vanilla.
Next add the powdered sugar a tablespoon at a time until the mixture reaches your desired texture and sweetness. Make sure you scrape down the sides in between

Note: First two paragraphs of the instructions are from Jessica at Su Good Sweets.

Tuesday, May 25, 2010

Always, always strain the ricotta.


Cooking and baking in my Dad's house is taking a little bit of getting used to. He has a pretty large, absolutely gorgeous kitchen with a fantastic gas stove, but nothing is set up my way and I've been tripping and stumbling my way through even basic day to day cooking. I've gotten so used to working in my what used to be my tiny cramped kitchen in Binghamton, that everything was like a well choreographed dance. I knew where everything was, where everything went, and most of the time everything was in it's place. It was small, so I learned to be neat and clean up as I went; but now, faced with all this wonderful granite counter space, I've forgotten everything I've learned. Now, I have things on every counter, I search for a spatula and I have no idea what flours (probably none), sugars and spices are in the cabinets. 

My idea of pantry staples are entirely different from his. My must haves include at least 3 kinds of flour, 2 kinds of sugar, various extracts, a couple pounds of butter (frozen), dried beans, vegetables (fresh and frozen), fruit, a variety of nuts, good quality baking chocolate, some grains, yogurt and low fat cottage cheese. His are something along the lines of 7 different cheeses, sandwich bread, bagels, pasta, store-bought soups, the phone to dial for takeout and his car keys to just straight-up go out for dinner. The only pantry staples I think we agree on are eggs and coffee.
Pictures courtesy of Nathalie Defrenne

Anyway, now I'm rambling but the point of all this is that I forgot to strain the ricotta before I made it into cannoli filling. I forgot to strain the ricotta because it didn't even occur to me to check the cabinet for cheesecloth. It didn't even occur to me, because why in the world would someone who doesn't bake anything have cheesecloth?

Well, it turns out there was not one but two packages of it in the drawer from  the last time I made ricotta cheese. I found it by accident after it was already too late. I mixed all the right ingredients and it tasted like cannoli filling, but the consistency was far too loose. I made a new batch and mixed them together to firm it up. The consistency still wasn't quite right but no one else noticed the difference.
Picture courtesy of Nathalie Defrenne
The lesson in all of this? Alway, always strain the ricotta. Oh, and don't forget the mascarpone. I've been so focused on the ricotta, I've forgotten to tell you about the most important part - it's the key ingredient and what makes a good cannoli, an amazing cannoli. 
Pictures courtesy of Nathalie Defrenne
This brings me to the shells. Maybe one day I will try making my own shells, but for now, I bought them. I'm just not interested in messing around with deep frying anything. Most bakeries are more than willing to sell you the empty shells and in the event that you can't find them - order them from Cannoli By Mail. There are very few bakeries in Binghamton so I ordered the mini shells online last weekend and they were very fresh. Now that I'm back downstate, bakeries abound and I simply stopped by my favorite french bakery this morning.
Cannolis
I used  fresh full-fat ricotta cheese but I suspect a good quality part skim would work just as well. Filling can be made ahead and stored in the fridge for a day or two but don't fill the cannolis until you are ready to serve them (or no more than 4 hours in advance). Makes enough to fill 70 mini or 35 regular size shells.

4 cup mascarpone
4 cups whole milk ricotta
2 tsp vanilla extract
1 tsp almond extract
3-5 cups confectioner's sugar plus more for dusting
mini chocolate chips (optional)
70 mini or 35 regular size cannoli shells

Fold the cheesecloth so that it is several layers thick. Place the ricotta in the center, wrap it up and squeeze as much liquid out as you can. Put the strained ricotta in a food processor and process until smooth (about 20 seconds).

Combine the ricotta, mascarpone, vanilla and almond extracts in the bowl of a stand mixer and beat until combine. Beat in 3 cups of confectioner's sugar and taste the filling. Add more sugar to taste for sweetness and proper consistency. It should be looser than a buttercream but thick enough to hold it's shape when piped.

Pour the mini chocolate chips on to a small plate and set aside.
Using a pastry bag (or in my case a large ziploc bag) and large decorating tip piped the filling into each end of the cannolis. 
Dip each end of each cannoli into the chocolate chips to coat.
Sprinkle cannolis with powdered sugar and serve immediately.

Saturday, May 22, 2010

What's Next?

I've been getting this question a lot lately. So much so that I just might scream. Obviously the thing to ask someone when they graduate college is what next? If I had a concrete answer, I may not dislike the question so much, but rambling on about lifeguarding, and wishful thinking about a move to Brooklyn in the near further doesn't really make a fantastic impression on people. Never the less, I'm sure you are all wondering the same thing and since Kate asked me the other day anyway, I might as well put the question to rest.

In June, I'll be traveling for 3 weeks through South Caucasus with a quick weekend in Hungary on my way home. After that, I'll be back in New York lifeguarding for the summer (hello tan) and looking for a real job - something with the (sustainable?) food industry, maybe a magazine or something developing/writing about recipes, basically whatever I can find. I'm also taking a web design class because there are so many things I want to do with this blog and I just have no idea how to do any of them.
Anyway, back to June and traveling because it's way more exciting than my lack of a job. I've been thinking for a little while how I'm going to handle this blog while I'm away. I will not have my computer with me, but my friend Jocelyn will. Internet, however, will be spotty. I also don't want to get too bogged down with it, so my posts will be sporadic. They will probably change from recipes to something more like a food review and of course pictures whenever I can. They may be cell phone pictures published directly from flickr, but hey, I do what I can.
Even though I have 2 memory cards, I'm going to have to dump the pictures off my camera at least once, so hopefully I'll have internet at that time and I'll post a few real pictures.
I've also added this neat little Current Location widget on the left side of this page so that you can see what city I'm in and follow my trip. I should be able to update this as well as twitter from my blackberry but, again, I'm not sure how much network coverage I will have. I guess what I'm trying to say is those three weeks will be a bit up in the air so just bare with me okay? Once thing I can promise is I will take a ton of pictures, eat lots of delicious things and share both with you when I return.
Now back to May, I have a completely unrelated recipe to share. I made this raspberry fruit tart last Saturday and it was quite a hit.
Before you write this off as a complicated tart with a fussy dough just read it through, I promise its so much quicker and simpler than you think.
I used my favorite french tart dough because it's beyond easy (read: no food processor, chilling, or rolling pin) and reliably delicious. It's recipe adapted from Paule Caillat of Promenades Gourmandes via David Lebovitz. I followed David's version exactly so I won't rewrite it, instead you can just click here

The most complicated part was the pastry cream, but really, even that was easy. I don't know why people make such a fuss about pastry cream. I did have a small panic attack when the I added the tempered egg mixture back to the heat and it became lumpy but, as soon as I took a whisk to it, it smoothed out nicely.


For the fruit you can really use any berry that you like or a combination of berries and kiwi. No apples or melon - that might be a little weird. I planned on doing mixed berries but at the last second decided on just red raspberries.
Lucky me, I had exactly 1/2 cup left of homemade red currant jelly that a friend (hi Sandy!) gave me earlier in the year. I used that for the glaze - don't you just love when things work out like that? I swear it makes my whole day.The pastry cream can be made a day or two in advance and stored in the refrigerator. Make sure to place saran-wrap directly on the surface of the pastry cream to keep a skin from forming. The tart shell can also be baked the day before, I stored mine in the tart pan, wrapped in saran-wrap, inside my covered cake platter. Whatever you do, do not fill and glaze the tart until you are ready to serve it. I had to put mine together about 3 hours ahead of time and it turned out fine, but I wouldn't suggest too much longer than that.


Raspberry Fruit Tart
Makes 1 9-inch tart

1 pre-baked french tart shell
1 batch pastry cream (see below)
2-3 pints red raspberries
1/2 cup red currant jelly

To assemble the tart: 
 Spread cold pastry cream over bottom of the cooled tart shell, using offset spatula or large spoon. Arrange fruit on top of the cream following a design if you like. I just filled every possible space with a raspberry.

To glaze the tart:
Bring jelly to boil in small saucepan over medium-high heat, stirring occasionally to smooth out lumps. When boiling and completely melted, apply by dabbing and flicking onto fruit with pastry brush; add 1 teaspoon water and return jelly to boil if it becomes too thick to drizzle. (Tart can be refrigerated, uncovered up to 3 or 4 hours). Remove outer metal ring of tart pan, slide thin metal spatula between bottom of crust and tart pan bottom to release, then slip tart onto cardboard round or serving platter; serve.


Pastry Cream
From Cooks Illustrated / Makes enough for 1 9-inch tart.
Chalazae are cordlike strands of egg white protein that are attached to the yolks—removing them with your fingers is easy and eliminates the need to strain the pastry cream after cooking. 

2 cups half-and-half
1/2 cup granulated sugar
pinch table salt
5 large egg yolks , chalazae removed (see headnote)
3 tablespoons cornstarch
4 tablespoons unsalted butter (cold), cut into 4 pieces
1 1/2 teaspoons vanilla extract

Heat half-and-half, 6 tablespoons sugar, and salt in medium heavy-bottomed saucepan over medium heat until simmering, stirring occasionally to dissolve sugar.

Meanwhile, whisk egg yolks in medium bowl until thoroughly combined. Whisk in remaining 2 tablespoons sugar and whisk until sugar has begun to dissolve and mixture is creamy, about 15 seconds. Whisk in cornstarch until combined and mixture is pale yellow and thick, about 30 seconds.

When half-and-half mixture reaches full simmer, gradually whisk simmering half-and-half into yolk mixture to temper. Return mixture to saucepan, scraping bowl with rubber spatula; return to simmer over medium heat, whisking constantly, until 3 or 4 bubbles burst on surface and mixture is thickened and glossy, about 30 seconds. Off heat, whisk in butter and vanilla. Transfer mixture to medium bowl, press plastic wrap directly on surface, and refrigerate until cold and set, at least 3 hours or up to 48 hours.

Thursday, May 20, 2010

That's right, there's cereal in my cookies.

When you're moving cities it's important to eat all the things you are going to miss when you're gone. 

Wings from the Dugout... 

Ice Cream and Chicken from the Big Dipper...

It's important to go with friends... 

It's important to use up all the stray baking ingredients hiding in your kitchen...

It's important to do so by making absolutely delicious compost cookies... 
I'm a little late jumping on the compost cookie bandwagon but better late than never, right? I threw in chocolate, white chocolate, dried fruit, and cereal. That's right, there's cereal in my cookies. I also threw in cornmeal in place of some of the flour just because I could. Basically, if a cowboy cookie and a Momofuku Milk Bar Compost Cookie had a child, it would turn out like this. I called them compostin' cowboy cookies because of their mixed breed but really, all that matters is how they taste.
I actually wasn't expecting such a delicious result, because I usually like my cookies simpler, but I was pleasantly surprised. The crispy brown rice cereal gives an unexpected chewy crunch and you really can't go wrong with both dark and white chocolate. The raisins and dried cherries are good but you could easily replace them with nuts if dried fruit isn't your thing. 

Compostin' Cowboy Cookies 
Typically compost cookies have potato chips in them but I don't think potato chips really have much place in this world outside bars, BBQs and football games - plus I didn't have any at home. Pretzels on the other hand would definitely go over well because salty and sweet might just be the best combination out there. Feel free to throw in whatever you have on hand, salty, sweet, crunchy, chewy, whatever. I listed a few variations at the bottom. 
Makes about 27 large cookies 

225 g unsalted butter, at room temperature
250g turbinado sugar 
180g sucanat 
1 tbsp honey 
1 tsp vanilla extract 
2 eggs 
300g whole wheat pastry flour 
115g stone ground cornmeal 
2 tsp kosher salt 
1 tsk baking soda 
2 tsp baking powder 
200g dark chocolate chips 
200g white chocolate chips 
150g crispy brown rice cereal 
200g mixed raisins and dried cherries 

Stand mixer or electric hand mixer is must for these cookies. 

Beat butter, sugar, brown sugar and syrup for three minutes until fluffy. Add vanilla and eggs and beat for ten minutes. It will be very thick, and fluffy. 
Mix flour, salt, baking soda and baking powder in a separate bowl, and add this to the cookie batter. 
Stir as little as possible to combine them. 
Add your mix-ins and stir just to combine. 
Shape large balls -I used my 3 tablespoon cookie scoop - and place on greased baking sheets, leaving a lot of room in between. I fit five cookies per sheet. 
Bake immediately or refrigerate until ready to use. 
Bake at 350°F for 9-11 minutes. 
Important note: Let them cool completely on the sheet or they will fall apart. 

Other Variations: 
-Replace the cornmeal with additional whole wheat pastry flour 
-Replace the cornmeal with rye flour 
-Replace the sucanat with dark or light brown sugar (cookies will be sweeter with dark) 
-Replace the sucanat with dark or light muscovado sugar (cookies will be sweeter with dark) 
-Replace the turbinado sugar with white sugar or another refined or unrefined sugar 
-Replace the chocolate, white chocolate, cereal and dried fruit with 500-600g of whatever mix-ins you have on hand. Traditional Momofuku Compost cookies have some combination of potato chips, pretzels, and chocolate. Pecans, walnuts and/or mac nuts would be good. 
-Add 100-200g of shredded unsweetened coconut 
-More mix-in suggestions: Peanut butter chips, heath bar bits, m&m's, peanut m&m's, butterscotch chips, mini Rolos, mini peanut butter cups

Live Activity Feed