Showing posts with label Extras. Show all posts

Thursday, September 9, 2010

Walnut Pesto

There were giant bunches of basil staring me down at the farm stand. They said:
"My only desire in my short basil-y life is to be pesto."
And so I acquiesced.
Basil can be very persuasive. 


Walnut Pesto
Makes about 6oz

A couple roasted garlic cloves, more or less to taste
1 ounce fresh basil leaves
1 ounce walnuts
3 tablespoons grated romano or parmesan cheese
1/4 cup good quality extra virgin olive oil
juice from half of a lemon
a few pinches of salt

First roast the garlic. (click here to learn how)
Next, combine garlic, basil and walnuts in a food processor and process for 30 seconds or until chopped fairly evenly. While the food processor is still running drizzle in olive oil, then the cheese and lemon juice. Add salt to taste but remember the cheese is salty already.

Toss pesto with warm pasta, or spread on crusty baguette (my favorite way to eat it). Also makes a great spread for sandwiches, a base for bruschetta, or pizza; and it's delicious mixed with ricotta, in calzones and stuffed shells.

Monday, August 23, 2010

On the topic of favorites.

adj.
1. Of, relating to, or typical of country life or country people.
2. a. Lacking refinement or elegance; coarse.
     b. Charmingly simple or unsophisticated.
3. Made of unfinished or roughly finished wood
4. Having a rough or textured appearance

I'm happy the summer is almost done. There I said it. I know there are summer-lovers everywhere shaking their heads and wagging their fingers at me but that's okay. Autumn really is my favorite season. I feel like I say that about every season as it's looming, just waiting to descend on us, but this time I really mean it. Autumn is the best. Actually, the only thing better might be late-August because the entire months of September, October and November are still to come. Plus August means tomatoes. 

So. Many. Tomatoes. 
This in turn means tomato sauce. 
So. Much. Sauce.

Now, I know what you're thinking; who wants to peel all those tomatoes? Well I have two words for you: don't bother. Thats right, ignore all those cookbooks that insist you must peel and seed your tomatoes, forget that fussy ice bath, and just toss your chopped up tomatoes right into the pot. It does yield a pretty chunky sauce, but I like it that way. If you prefer a smoother more uniform result, just quickly take a stick blender and smooth it out. Some might call this the lazy way to do it but I'm going go ahead and call it rustic - which by the way, while were on the topic of favorites, might just be my favorite word. 

So here it is, the most charmingly simple, unsophisticated tomato sauce. Now you have no excuse for buying that jarred red goop that wishes it were pasta sauce.


Rustic Tomato Sauce
This is more of a guide then a recipe, there really are no right or wrong measurements. If you don't like onion, use less; If you really like onion, use more. You get the idea, feel free to play around with the proportions and don't be afraid to taste it as it cooks. There is no need for sugar here because of the sweetness from the carrot and grape tomatoes. Be generous with the salt, it will round out the flavor. Tomatoes can be quite costly from a supermarket even when they are in season however this can be a very inexpensive recipe if you seek out ingredients from your local farmer's market or better yet the actual farm. Makes about 1 quart of sauce.

Olive oil
1 medium yellow onion, chopped
1 small head of garlic, chopped
1 carrot, chopped in large chunks
~3 pounds Roma tomatoes, chopped course
1/2-1 pint grape tomatoes, sliced in half
2 tablespoons tomato paste (I like Brad's organic)
garlic powder
onion powder
dried oregano
juice of 1/2 a lemon
sea salt or kosher salt
freshly ground pepper
fresh basil and parsley, chopped course

Heat a large pot or dutch oven over medium-high heat.
Add a swig of olive oil and wait for it to heat up.
When a drop of water makes the oil splatter, add the onion and carrot. Saute until onion is softened then add the garlic. Turn the heat down to medium and continue to saute, stirring occasionally, until the onion is translucent. Be careful not to let the garlic burn.
Next add the chopped tomatoes and grape tomatoes. Cover and turn the heat up to high. 
The tomatoes will begin to release their juices and break down. When a liquid starts to form add the tomato paste, a few large pinches of dried oregano and a couple shakes of each garlic and onion powder. Stir to combine, turn the heat down to a simmer and replace the cover.
Let simmer until the tomatoes have mostly broken down, add salt and pepper to taste. Stir in the lemon juice and replace the cover. Continue to simmer covered (about an hour and half or two hours from the time you added the tomatoes.
Taste and adjust the salt and pepper.
If you want a smoother sauce, blend it at this point with a stick blender or in a regular blender (this can be dangerous with very hot liquid so be careful). You can choose to blend it just part of the way leaving some chunks or smooth it out completely. I chose not to blend it at all. (If you go this route remove the carrot - I ate it right out the pot and burnt my tongue). If you put the sauce through the blender return it to the pot.
Add the coarsely chopped basil and parsley. Stir to combine, cover and cook another couple minutes.
Spoon sauce over pasta, use as a hot bruschetta on thick, crusty slices of bread or freeze it in ball jars for later use. Relish all the time you saved not peeling your tomatoes.

Saturday, August 21, 2010

Pickle Failure

It seems like everyone has pickle story. Some have long been singing the praises of all-things-fermented or brined and some are just learning to like them but never-the-less, recipes are popping up everywhere.

If you follow me on flickr, you saw my pickles in their early stages. Plump, kirby cucumbers - nestled together with spices - working hard to ferment themselves. What you did not see coming (and neither did I) was the mold. That's right, I pulled my pickles out a week ago only to discover a thick layer of fuzzy mold on top of a thin egg-white-looking layer blanketing the top of my pickles (too much information?).

I peeled up the mold and examined my pickles to see if they were okay underneath the white layer - they weren't. They were soft and squishy and definitely not something I wanted to eat. Sigh. 
Finally, I dumped the whole jar and sent an email to Shannalee to see if she could figure out what I did wrong. We both decided that I let them ferment for too long (two weeks). I also read numerous sites that said to put the jar in a dark place while they ferment - which is what I did and I think that helped the mold along as well. Oh well.

I bought another bunch of cucumbers from the same farm and started a new jar. This time I put them on the counter where I could keep an eye on the sneaky little mold-producers and I only let them sit 6 days.
This afternoon, I pulled one out, cut it open and took a bite.

I hate to say it, but I was disappointed. They are just barely pickled yet the tops of one or two are already slightly soft and threatening to turn to mush. Leaving them out to ferment a bit longer is not an option...I can sense them just daring me to leave them one more day so they can grow that thick mold again. Gross. So my question for you is, what now? Am I expecting too much from a pickle without vinegar? Maybe this is how they are supposed to taste. I don't know, I guess I'll try again.

These fussy, little, good-for-you bacteria better get it together or I'm going to ditch them for their better-tasting cousin, yogurt. We're already good friends anyway.

Failed (or not?) Lacto-Fermented Pickles
Adapted from Food Loves Writing

Pickling cucumbers
Water
Kosher Salt
Caraway Seeds
Whole Black Peppercorns
1/2 of a white onion, peeled and chopped in large chunks
3 garlic cloves, peeled

Fill a quart size mason jar about a quarter or a third full with water, and add two tablespoons of sea salt, 1 tablespoon of caraway seeds, 1 tablespoon of black peppercorns, three garlic cloves and the onion chunks. Add in cucumbers, as many as will fit comfortably, and then fill the rest of the jar with water, leaving a little room at the top. Cover and set on the counter for 5 to 8 days (I left mine for 6). Put them in the refrigerator when they are done fermenting or when you sense they will turn moldy if don't. 
Hopefully yours turn out better than mine!

Tuesday, March 9, 2010

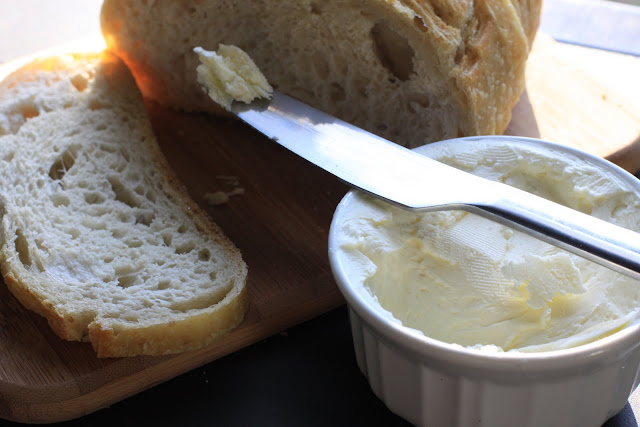
Fresh Butter

I debated whether or not I would share this with you. There really isn't much to it and it's definitely not a recipe. I didn't measure anything at all and I don't know how much it made. There are only two ingredients and it takes about 15 minutes. My friends made faces at me, while I sat on the couch shaking a bell jar until my arms hurt. They told me I'm nuts for making something that I can easily get already made in stick form. It's not like making my own was any cheaper. 


Actually, I wouldn't know because I didn't measure anything.


So it was decided, I'm nuts and no one else would really want to make butter. I hadn't planned on sharing this with you. Then I tasted it. I hadn't planned on sharing this with you but then again, why not? There must be others like me out there. Don't y'all deserve the chance to make your own salted sweet cream? I'd like to think so. 
Butter
Maybe it's a little bit in my head, because I'd like to think that homemade foods are always better than store bought. Whatever the reason, this butter was so rich and creamy with slight sweetness, a bit of tang and a touch of salt. Perfect on a good slice of crusty sourdough bread.

Organic Heavy Cream
Kosher Salt

I didn't include measurements because you can make as much or as little as you would like. I used about a half-pint of cream and a hefty pinch of salt.
Put the cream and the salt in a jar and shake vigorously until the liquid separates from the solids. Mine took about 15 minutes of shaking (with quick breaks here and there to spare my arms). Eventually you will be left with a large solid lump in a jar of liquid. The lump is your butter and the liquid is buttermilk. Separate the buttermilk and save it for another purpose (soda bread perhaps?). Pat the butter lightly with a paper towel just to remove extra moisture. This will keep it from going bad as quickly. Store covered in an airtight container. Enjoy!

Friday, February 19, 2010

A Lighter Lemon Curd


Did you know it was possible to get writer's block even when the only thing you write is a food blog?


Well it is.
I've been trying to write this post since tuesday and I just can't do it. Usually when I get stuck I put down my laptop, walk away and try again later, but this time I can't get past the first line...
'If I had to pick a favorite "flavor" it would always be lemon. Always.'
Each day this week I've returned to this post, written a few lines, promptly decided I didn't like what I had written, deleted it, and closed my laptop again until the next day. Well, no more.
It's not fair to keep such a delicious recipe from all of you just because I've been getting my words a bit tangled. Without further fuss here is lighter, healthier recipe for lemon curd. Do yourself a favor and make this tangy, silky, spread that has clearly left me speechless.


A Lighter Lemon Curd
Makes about 1 cup.

3/4 cup lemon juice, strained

3 tsp of lemon zest

5 tablespoons honey
2 eggs, lightly beaten 

In a small saucepan, mix together the lemon juice, zest and honey. 
Place over low heat and stir till nearly boiling. 
Gently, pour the lemon syrup into the beaten eggs, a little at a time, whisking constantly for about a minute.
Return the mixture to the pan over low heat. Stir constantly with a whisk until it thickens. 
Remove from heat and pass through a strainer to remove zest bits of egg that may have cooked and turned lumpy. I don't mind the zest or lumps so I skip this step unless I'm using the curd as part of another recipe or if I plan on serving it to other people. I kind of like the texture so If it's just for me I leave it the way it is.

Monday, February 15, 2010

Some kind of positive connotation

I've always been a little (okay, a lot) grossed out by mayo. For starters I grew up thinking I didn't like the taste of it, because we only had miracle whip in my house. Turns out it was not mayo but miracle whip that I didn't like. Still I only liked very small amounts of it in select things - chicken salad, egg salad, or on a sandwich with mustard. Shortly after I discovered my taste for mayo I learned what was in it and it just started grossing me out again. All that oil emulsified with an egg yolk, it really is just unnecessary. Except of course where I really can't avoid it - that tablespoon or two in my chicken salad.
Usually when I make something unhealthy instead of buying it, it bothers me a little less. I know that's kind of ridiculous but the fact that it's homemade carries some kind of positive connotation for me. Maybe it's because I see all the fresh whole ingredients that go into it, or maybe (okay without a doubt) I'm harboring a little distrust for the commercial food industry these days. Whatever the reason, I feel less queasy eating unhealthy things that I've made in my own kitchen.


On that note I will leave you with recipes for mayo and my healthier adaption of Urban-Farm (ranch) dressing.


Alton Brown's Mayonnaise - the only substitution I made here was olive oil instead of corn oil.


Urban-Farm Dressing
Susan calls her version of buttermilk ranch dressing farm dressing since she lives on a farm not a ranch. I went with the trend and renamed my adaption urban-farm dressing since I live in a city (and sometimes wish I lived in a farmhouse). Hers used sour cream, mine uses greek yogurt. I specifically like how it's mostly yogurt, the mayo is not really discernible but if you were to leave it out you would notice something is missing.
 Adapted from Susan at Farmgirl Fare. Makes about 3 cups.

1 1/2 cup fat-free plain greek yogurt
1/3 cup mayonnaise (homemade)
1 teaspoon granulated garlic
1 teaspoon granulated onion
1 heaping teaspoon dried dill weed
1 teaspoon salt
Freshly ground pepper
1 to 2 Tablespoons white balsamic vinegar
1/2-1 low-fat buttermilk

Next time I might also add any number of these extras as well:
A dash of Worcestershire sauce
A smidge of dijon mustard
A pinch of cayenne or paprika
Finely shredded Parmesan or Romano cheese

In a small bowl or large measuring cup, combine the yogurt, mayonnaise, granulated garlic, granulated onion, dill weed, salt, and several grinds of pepper. Mix well.

Stir in the balsamic vinegar and then 1/2-1 cup of the buttermilk depending on whether you want a thicker dip or a thinner dressing.

Adjust the seasonings to taste, adding another tablespoon of balsamic vinegar if desired, along with any of the optional additions. Keep in mind that the flavors will become bolder over time.

-Makes a great dip for (baked) sweet potato fries!


Live Activity Feed