Thursday, January 28, 2010

Kicking The Can


Lately I've become a crazy person about the things I will eat. It's not that I don't like most foods (I do), it's just that gradually I've pulled more and more processed food out of my diet. This time four years ago I was guzzling diet coke by the gallon (even for breakfast eeek)! Now the thought of buying a soda doesn't even cross my mind. 


In fact, I've gotten so particular about avoiding canned and pre-made foods that I've even taken to making my own chicken broth as often as my schedule will allow. When it's tomato season I make as much tomato sauce as my little freezer will hold. I've been making almond butter, ricotta cheese, and ice cream but, somehow, canned beans just slipped through the cracks. 


I think it's because I was secretly intimidated by them. All that forethought and preparation for a food that is supposed to make my life easy. A food that I should always have on hand for a quick healthy meal. Dried beans aren't waiting patiently in your cabinet ready to rinse and eat. No, they are fussy little creatures insisting on hours of time soaking and cooking before getting to the point in which you'd actually want to eat one. 


Never the less, about a year ago I tried to cook my own dried Borlotti beans. A decision based partly on a lack of canned Borlotti beans and partly because I was on an "eat, whole, completely unprocessed foods rampage". It was quite a humbling experience. The skin wrinkled and peeled, they tasted starchy and eventually fell apart leaving me wondering how I could possibly have screwed them up. I tried again with chickpeas with no better results. 


I had just about had it with dried beans and I waited a whole year before I tried again. I convinced myself the canned ones were fine and just bought organic low sodium beans whenever I could. Then one day I read an article about Bisphenol-A (BPA) in the lining of canned goods. I researched it a little bit more and that was it. I was done with canned beans. Unfortunately I can't avoid canned tomatoes in the winter when I make chili or tomato sauce, but beans I can surely avoid.


This time I was determined to make it work. I bought a large bag of organic chickpeas and followed the instructions for bean to water ratio. I didn't add salt because I heard it makes them tough and increases cooking time. The package said to soak for 8 hours but I went for overnight. The next morning my darling little chickpeas had soaked up the majority of the water and looked plump. They were about the size of the chickpeas in cans. That alone was an improvement on last years attempt.
I eagerly drained the water, rinsed them off and placed them in a pot of water to cook. An hour later I tasted one. To my surprise they were tender, full of flavor, not the least bit starchy and not at all rubbery like their canned counterparts.


I'm sold. No more canned beans for me. As for their extended cooking time and inconvenience? Well, I already jar and freeze everything so why should beans be any different? The answer is, they're not. This morning I made 40oz of red kidney beans, measured them out into ball jars and froze them. Convenience is all about preparation. 


I also jarred and froze the carrots an the chicken from the chicken soup/broth that I made last night.


How to Cook Dried Beans
 Pick any stones out of the beans. 
Measure the desired amount of beans and water on a 1:4 ratio (ex: 1 cup of dried beans to 4 cups of water)
Let soak 12-18 hours (I lean more towards 18)
Rinse beans.
Add beans to a large pot and fill with enough water to cover by an inch or two.
Cover and bring to a boil.
Let water boil for a minute or two and turn down to a simmer. Leave the cover on but slightly askew so that the water doesn't boil over.
Cooking time will vary depending on the bean (chickpeas take about an hour, red kidney beans about an hour and a half). The best way to tell is to just taste one. Make sure beans are completely covered for the duration of their cooking time. If the water level gets to low, just add more water.


 Maybe now I will get up enough courage to properly can things so that my freezers don't look like this...


My extra freezer stuffed with jars so that I don't take over the main freezer.

Tuesday, January 26, 2010

Venison Golabki


I really like venison. It's like beef's leaner more sustainable cousin. I've always liked the way it tastes and I'm happy to eat a healthier red meat, but the main reason I really like it is the environmentally friendly way that it ends up on my fork. As far as I know you can't just buy a chunk of venison in the supermarket. It's not farm-raised, pumped full of growth hormone, fed genetically-modified grain or caged into a small area. There are only a couple ways to get venison; befriend someone who will kill it for you, kill it yourself, or order it at a restaurant that had someone kill it for them. I went with the first choice. 
Bryan had a few pounds of venison in his freezer from his father's hunting outing this past fall. I eagerly suggested we make some venison golabki (traditional polish stuffed cabbages). Usually they are stuffed with beef or pork and rice but we used quinoa for a more whole grain. We also chopped up some vegetables to mix into the filling. Be patient with the cabbage leaves. They are a little difficult to keep from tearing but the golabki stay wrapped surprisingly well. They may not be as pretty as your polish grandma makes but they are sustainable, delicious little guys.


Venison Golabki
Measurements are approximate but play around with it a bit. It's really not an exact science. Serves 6-8


1 1/4 lb ground venison
1-2 large heads green cabbage
1-2 eggs
3/4 cup quinoa (uncooked)
3 28oz cans plain tomato sauce

1 yellow onion
1/4-1/2 head of garlic (peeled)
1/2 lb small white mushrooms, sliced
1 carrot, chopped
1 red pepper
1 green pepper
4 cherry hot peppers
handful of spinach
2 tsp hot paprika
1/2 tsp salt
generous amount of pepper


Pour a thin layer of tomato sauce into the bottom of a large saucepan or dutch oven. Cut the bottom off the cabbage, core it and shred the unusable small leaves. cover the bottom of the pot with the shredded leaves to create an insulating layer between the bottom of the pot and the golabki. This helps to keep them from burning.
Bring a large pot of water to a boil and blanch the cabbage leaves (about 7 minutes or until soft). Rinse and pat the leaves dry. Set aside.
With a wooden spoon mix venison eggs, paprika, salt, pepper and quinoa in a bowl and set aside.
Chop the carrot, peppers, onion, garlic and spinach to a manageable size and add them to your food processor along with a handful of the mushrooms. Use the chop setting to mince it but don't leave it on so long that it becomes mush. I like a little texture.
Mix it into the meat.
Lay out a cabbage leaf and spoon 1/4-1/2 cup of the meat mixture into the center (adjust the amount for the size of the cabbage leaf.) The leaves should be soft enough to roll but might fight back a little bit around the stiff rib areas. Be patient and they will cooperate.
Place each wrapped cabbage into the pot seam side down. Pour another layer of sauce over the golabki and continue to nestle them in alternating sauce, golabki and the remaining mushrooms until gone. Make sure the last layer is sauce and that the mushrooms and golabki are well covered.
Bring to a boil and then reduce to a simmer. Cook covered for 1 1/2 - 2 hours or until quinoa and venison are cooked, cabbage is soft and sauce has developed full flavor.
The leftovers freeze well and actually taste better the second day.
Enjoy!


Monday, January 25, 2010

Camtini


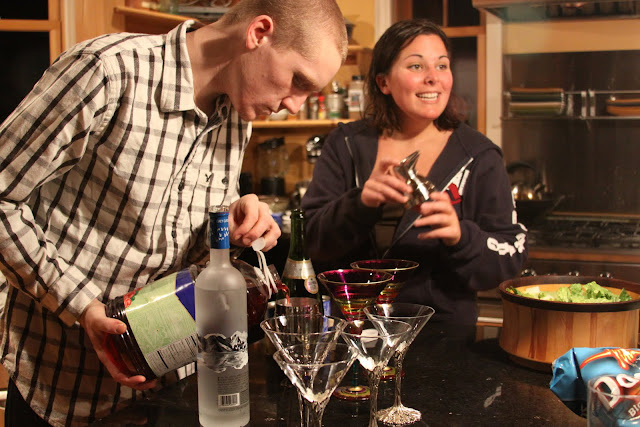
Alexis' family introduced me to the camtini. I'm pretty sure it's named for her mother Camille (correct me if I'm wrong, Alexis.) It's a vodka based martini with pineapple juice, cranberry juice, and champagne and it is definitely my drink of choice at her house.

Fill a shaker with ice cubes, add 3oz vodka, 1oz pineapple juice, 1oz cranberry juice and shake well. Pour a splash of champagne into the bottom of a martini glass and pour the vodka/cran/pineapple mixer on top. Enjoy!


Sunday, January 24, 2010

Green Mountain Recap

I love Vermont. It's always been one of my favorite states (the other is Maine). I took almost 1000 pictures this week but I'll leave you with just a few. Head over to my Flickr for more.

Top of Mt. Snow
Picture courtesy of another skiier


Morning sun in the kitchen


Alexis' backyard                                                   Bryan and Louie


Top of Olympic at Mt. Snow
Picture courtesy of Bryan Khouri


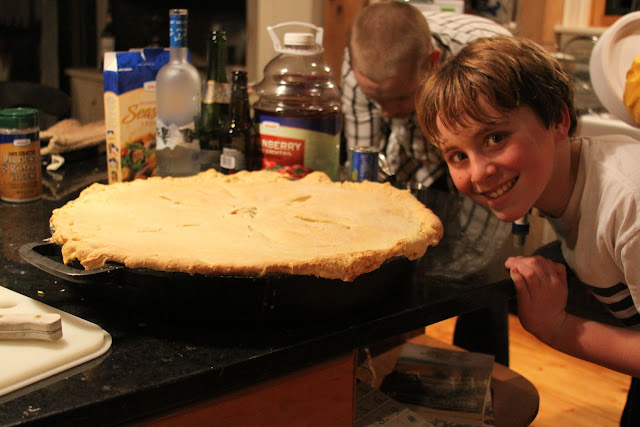
Alexis' Mom Cami made a delicious chicken pot pie in the largest cast iron skillet I've ever seen. Look at the size of Brett's head next to it for perspective. It took two of us to lift it into the oven.


Left: Vermont Sapling (maple syrup liquor) SO good, especially ice cold. I meant to bring a bottle home but just didn't get a chance.
Right: Alexis' and I making baked ziti in the giant cast iron pan. Picture courtesy of Bryan Khouri


Drinking Camtinis while we cook.
Picture courtesy of Bryan Khouri


It's actually a lot of fun to cook in mass quantity but we had no idea how to judge the proper amount. We made 8 boxes of rigatoni but ended up filling this pan with probably 5 or 6. We used the leftover tomato sauce and meatballs that Cami made for dinner earlier in the week, freshly grated mozzarella, whole milk ricotta, 2 eggs, fresh parsley and parmesan. The tomato sauce and crumbled up meatballs totally made it. Cami promised me the recipe and I'm very excited since I have yet to come up with meatballs that I'm totally happy with.


Cami's Homemade Black Forest Truffles (watch out Lindt you've got competition.)


Louie


Fiona


The group in Alexis' Living Room

Tuesday, January 19, 2010

Organic Green Mountain Power Bars


Another early morning departure for me. At 4am my friends and I packed up our skis, snowboards, and bathing suits and began our 4 hour drive to Vermont for four days or skiing and hanging out in the hot tub. We always bring boxes of granola bars for and easy snack and energy on the mountain so instead of buying them I decided to make them.

I started out with Heidi Swanson's Big Sur Power Bars in mind but ended up changing the recipe so much that I feel i can call these my own. I stuck with her her basic idea but made it my own with almonds, walnuts, cranberries and Ghirardelli dark chocolate chips. I made two batches; one with ground espresso in them for extra caffeine and energy and one without. I made the first batch in a 9x13 glass pyrex for thinner bars and the second in an 8x8 for thicker bars. In the end I decided I like the thicker bars without the espresso the best. Feel free to mix in whatever nuts and dried fruits you choose and make sure to layer parchment paper in between the bars if you stack them up in a container.   Otherwise they will just squish together in one sticky lump.


Organic Green Mountain Power Bars
I recently bought one of those sprayers that you fill with olive oil to use like a non-stick spray so I sprayed my pan with that but brushing the pan with olive oil or butter works just as well All ingredients are organic except the olive oil. Makes about 20 Bars.

Olive oil to coat the pan
1/2 cup walnuts, chopped
1/2 cup slivered almonds
2/3 cup unsweetened shredded coconut
1/2 cup dried cranberries
1 1/4 cups rolled oats
1 1/2 cups unsweetened crisp brown rice cereal
1 cup brown rice syrup
1/4 cup turbinado sugar
1/2 teaspoon fine-grain sea salt
2 tablespoons ground espresso beans (optional)
1 teaspoon pure vanilla extract

Preheat oven to 350 degrees. Grease an 8x8 baking pan

On a rimmed baking sheet toast the pecans, almonds, and coconut for about 7 minutes, or until the coconut is deeply golden. Toss once or twice along the way. Mix the oats, toasted nuts, coconut, and the cereal, together in a large bowl and set aside.

Combine the rice syrup, sugar, salt, espresso (if using), and vanilla in a small saucepan over medium heat and stir constantly as it comes to a boil and thickens just a bit, about 4 minutes. Pour the syrup over the oat mixture and stir until it is evenly incorporated.

Spread into the prepared pan and cool to room temperature before cutting into bars.


I won't have computer access so no posts until I get back on Saturday. Lots of snowy pictures to share when I get home though. :)

Sunday, January 17, 2010

Weeeeeee! 4.5 miles!

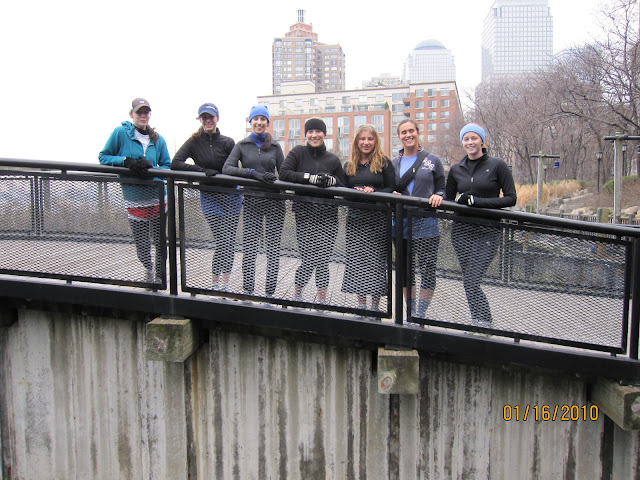
Just wanted to share a few pictures from the KERF run this morning. We did 4 and 1/2 miles (oops I was really only supposed to do 3 but the leg feels good, hope it holds up)!

In the lobby of the Gild Hotel (it was gorgeous!)
Photo courtesy of Kath's husband, Matt

On our run
JH, Janna, Dori, Kath, Me, Caronae
Photo, Courtesy of Kath

Stretching afterward :)
Photo Courtesy of Kath

Saturday, January 16, 2010

The Brooklyn Brewery with Kath from KERF


Weeeeeeeeeee! I feel like I just met a celebrity. Well, I guess in blogger world I did :). Kath writes the first blog I've ever read; Kath Eats Real Food. She's in New York for a wedding and hosted a meet-up at the Brooklyn Brewery. Of course I went and it was so much fun, but when I got there I took out my camera and realized THE BATTERY HAD DIED. Why I didn't check this BEFORE I left my house or just simply take my spare battery along is beyond me. No worries though, Kath took some pictures that she's going to email out. I will update this when I get them.


The brewery was pretty cool. It was too hard to coordinate all of us taking a tour so we hung out in the beer garden style room. Beer isn't really my thing but I did try the Winter beer and it was actually pretty good! Maybe I'm just a little bias because I like supporting local business and obviously it's all brewed right there or maybe I'll turn into a beer drinker yet ;).

Some of the group is going for a run downtown tomorrow and I'm sooo excited because my physical therapist told me I could up my mileage from 1.5 to 2 miles per run (on the road, not even treadmill)! That's still nothing compared the to the 15 or so I was running each week before I hurt my leg last spring, but hey,  It's progress!

The camera is charging right now and will be ready to go for the morning!

UPDATE: Pictures added :)

Friday, January 15, 2010

Almond Butter


Monday I'm heading back home for all of 12 hours and then tuesday morning I'm leaving (FAR too early) for Vermont for what has become my annual crew friends ski trip. We stay with our friend Alexis, ski all day, and hang out in the hot tub all night sipping her family's infamous camtinis (I can't for the life of me remember everything that goes into them but I know it's something like champagne, pineapple juice, cranberry juice and a couple other things in a large martini glass). 

Anyway, food on the mountain is less than desirable and about 12 dollars per greasy chicken finger. Yuck. Needless to say we pack our own lunch, usually peanut butter and jelly. I've been thinking about making my own nut butters for a while and this seemed like the perfect opportunity. I've really never been in love with almond butter and it's usually about 1.5 times the price of peanut butter but almonds are a healthier nut so I figure a nice compromise is to make my own. First I made a small batch to taste it and it was delicious, so I packed up a jar for my mom and proceeded to make a large jar to bring to Vermont.

This is SO simple I really don't think I can call it a recipe. You need 3 things: 4 cups of organic raw almonds, 1-2 tsp kosher salt and an 11 or 14 cup food processor. Put the almonds and salt in the food processor and process for some ridiculous amount of time (15 minutes or so). The poor machine will shake, shudder, whir and get really hot and just when you think nothing is happening and you are stuck with 4 cups of crumbly, warm, almonds, it will magically smooth out and turn into wonderfully creamy almond butter. That is, of course, assuming you are scraping down the sides every few minutes and breaking up the large stiff clumps that form and make a horrible racket as they thump around in a circle. Makes about 16oz.

*Note: If you are using an 11 cup food processor I suggest doing only 2 cups of almonds at a time otherwise there is just too much bulk to get the right consistency. The first time I made this with just 2 cups and had no problems. When i doubled it to 4 it just wouldn't smooth out until I finally took half out and processed it in two batches. If you're using a 14 cup processor you are good to go. If all you have is a mini-chop (that's all I have when I go back home), then try maybe 1/2 cup at a time and a 1/4 tsp salt (and let me know how it works). If you prefer you could totally use any nut instead of almonds.


Wednesday, January 13, 2010

Chunky Lentil Soup


The first time I made lentil soup I used two of Heidi Swanson's recipes; one from her cookbook Super Natural Cooking and this one from 101cookbooks. I used them more as references than recipes and made it up as I went. I've since made variations on this soup a few more times and at this point it is so different I would say I could call it my own. It's warm, chunky, comforting and perfect for a cold, snowy, evening. Feel free to add or remove vegetables as you see fit, it really is a soup where anything goes. I would, however, definitely recommend a dark leafy green.


Chunky Lentil Soup
I didn't really measure anything but I will do my best to write down approximate measurements here. It came out pretty chunky and a little less soupy so if you want more broth and less stew/risotto increase your chicken broth. The soup will continue to absorb liquid after it cooks. I used lacinato kale because it happened to look good in the market and has sturdier rough texture but regular green kale, mustard greens, collards or spinach would work just as well. Serves 4, makes great leftovers, and freezes well.


3/4 french lentils
3 cups water
1 tbls olive oil
1/2 large onion, chopped
2-3 cups low sodium organic chicken broth
14oz (1 can) Organic diced tomatoes
Splash of dry red wine
1 small bunch dark leafy green, chopped (see headnote)
a couple handfulls shitake mushrooms, stems removed and sliced
garlic powder, pepper and salt to taste
grated parmesan cheese, greek yogurt, and/or hot sauce for serving


Bring lentils and water to a boil, cook until just tender, about 20 minutes.
Add mushrooms and a splash of water to a large pan cover, cook until just softened, set aside.
In a separate pot saute onion until soft add diced tomatoes and chicken broth and wine, bring to a boil, lower heat and let simmer. Add lentils and any remaining cooking water (should be very little if any). Stir in chopped kale.
Add garlic powder and let simmer covered, about 10 minutes more. Kale should be wilted but not mushy, lentils should be soft but retain their shape.
Add salt and pepper to taste. Serve garnished with grated parmesan or a spoonful of non-fat plain greek yogurt and drizzle of hot sauce.


Monday, January 11, 2010

Hello JFK, I Missed You.


I really do love to travel. I get antsy when I don't have a trip to look forward to, and I will go ANYWHERE, but part of the fun is arriving home again. It makes my everyday routine seem less mundane...at least for a little while. The sun was wonderful, a much needed break from the frigid cold here in New York, but I am so happy to be back, to cook again and very much looking forward to skiing in Vermont next week.

No recipes today,  but here is a little about Aruba and few pictures. I'll be posting more photos on my Flickr over the next couple days
Aruba is about 15 miles off the coast of Venezuela in the Southern Caribbean Ocean. It's part of the Dutch Antilles and a large part of their population is originally from Holland and the official language is Papamientu (combination of Dutch, Portuguese, Spanish, French and English with Arawak and African Influences...talk about confusing.) In addition to Papamientu many of the islanders actually speak all of these languages separately.  Their cuisine is interesting mix of dutch, spanish, and tropical. Meat and fish play a very large role and the food in general is VERY heavy. Too heavy for me in fact, but it reminded me that I have one more New Year's Resolution; Get over my fear of cooking fish. I try to like fish, I really do, but unless its raw and in sushi it just tastes fishy to me. It must be in my head because any time I go on an island vacation I eat plenty of fish and in Aruba grouper seems to be the local catch. 
After countless sesame crusted seared tunas, yellow tail carpaccios, filet mignons and salmon sushi, I decided it was time to suck it up. I ordered grouper (okay, so it was blackened and inside a bun but whatever, I'm making progress). You know what? It tasted pretty good. I had grouper once or twice more during the week and Mahi Mahi as well and now my resolve to like fish has returned. Just eating it, though, is part one of my fear of fish. Cooking it, that's part two. 
What's so scary about cooking fish you ask? Well let's see, 
1. Making sure it's 100% fresh and sourced well; farm raised, organic fed, cold water grown, eco friendly, mercury-free, renewable, hand massaged, well pampered, swam upstream, lived-a-good life, happy little fish blah blah blah. The whole thing is just over-whelming. 
2. Then I have to decide what KIND of fish I want. Asking the guy at the Whole Foods counter what is the least fishy doesn't work because even fishy-fish doesn't taste fishy to those who like fish (whoa). I know I don't like cooked salmon, it's like the fishiest of all fish but after that I'm lost. 
3. Okay, now I've successfully chosen a piece of fish that won't kill me, the environment, or taste like it's still swimming in salt water. What do I do with it?? I haven't the slightest clue how to cook this damn thing. Better start researching. (Keep in mind I have to cook it the same day I buy it cause the smell of fish? Ew, almost as bad as its fishy taste). Bear with me for some sort of fishy escapade later in the week when I gather my courage. 
For now I'll leave you with a few photos from the week.
-Super-Tan-Lisa (Ha! I kid, I was so pale before that now maybe I'm just close to normal human color).


Live Activity Feed